Component 1: The Data Source
Preparing the Data Source
Input 1: Excel® Spreadsheet
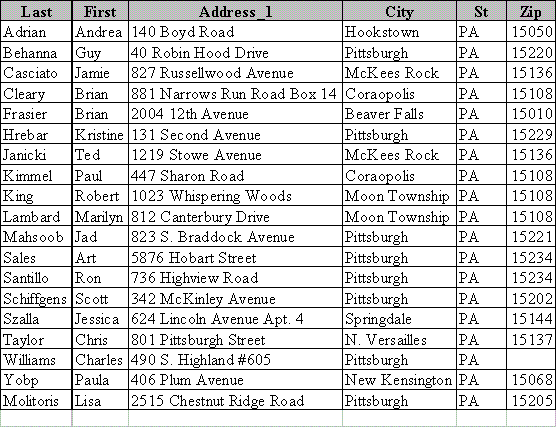
This picture is what your Data Source should look like.
An Excel® spreadsheet containing names and addresses.

Notice that each cell contains a portion of the name and address.
Note gray-shaded row #1 (Last, First, Address_1, City, St, and Zip).
These are your column headings. When you designate
a Data Source you must have column headings.
These column headings will be referenced directly by the Word® Mail Merge process.
The order of the columns of data is NOT important (Column A, B, C, etc). "Zip" could come before "Address_1" and it would not effect your Mail Merge process.
You control the order of the output of each cell later, before the merge.
Now it's your turn!
Open Excel®. Create and save a spreadsheet like the one in the picture. Use actual information or make up your own data. Return here when you have finished.
Done? Welcome back!
Does your Data Source Excel® spreadsheet containing names and addresses resemble the previous picture? If not, go back to Excel® and modify yours.
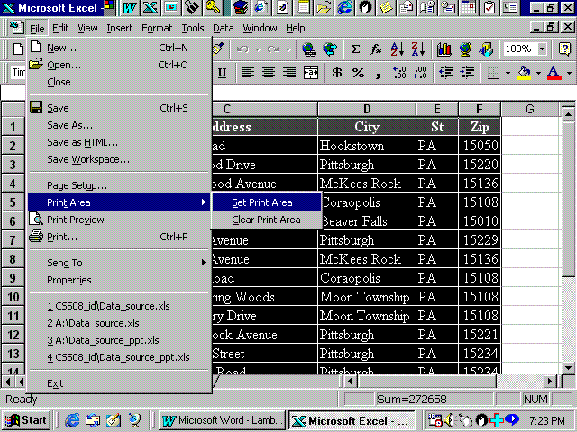
Format and Set Print Area
You don't have to sort the information, but the other steps are mandatory.

You have now "Set the Print Area" for Columns A through F. By doing this you have identified the names and addresses you want Mail Merge to recognize and use.
Each row represents a new document that will be created.
Save
Now save the file to a meaningful name. You can either leave Excel® open or you can close it.
Remember: Your Data Source must contain column headings. Make them meaningful names. Write them down or print the first page of your Data Source to use as a reference. You will need to know the column headings later on. Sort, format and set the print area for only the rows/columns you want to use in your merged documents.


